Promise
promise 主要是用來解決非同步的行為,在未確認的時候會在一個 未確認狀態(pending) 的狀態,等到非同步的事件處理完成後才會進入 已確認的狀態(settled)。
已確認狀態分為:
已實現狀態會透過 resolve 這個參數來回傳一個結果,可以用 then 來做接收。
已否決狀態會透過 reject 這個參數來回傳一個結果,可以用 catch 來做接收。
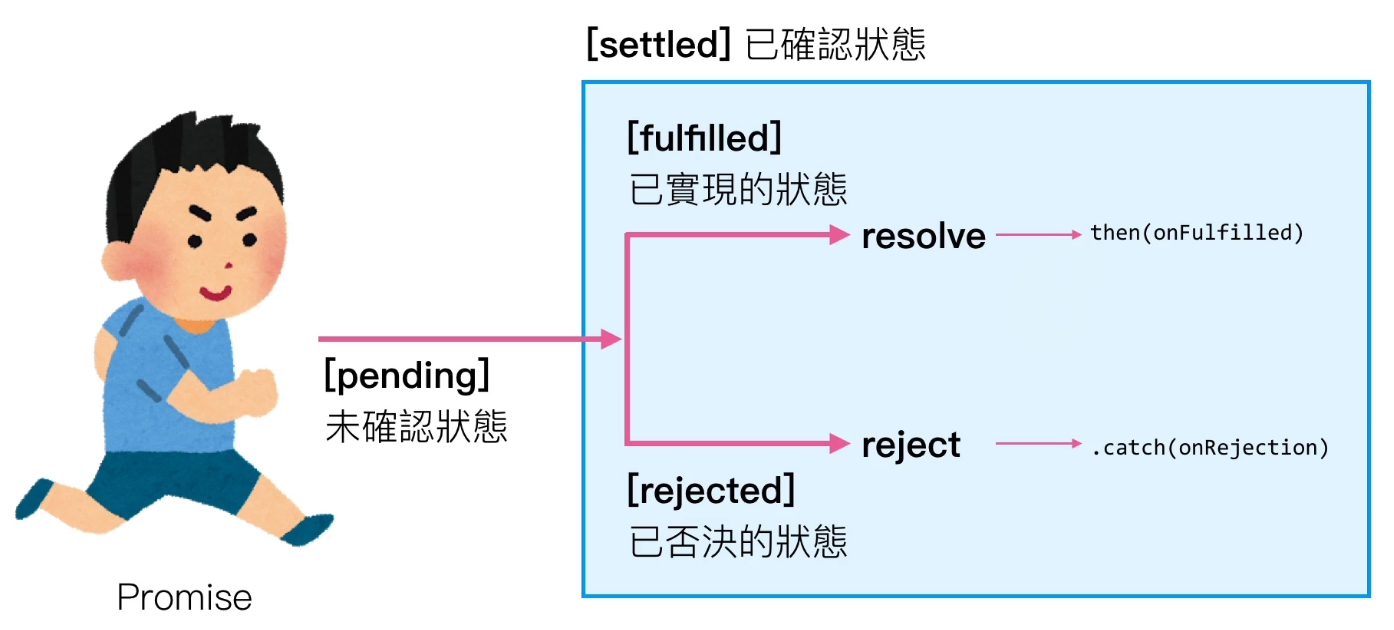
語法可以跟過程可以參考 ↓ ↓ ↓
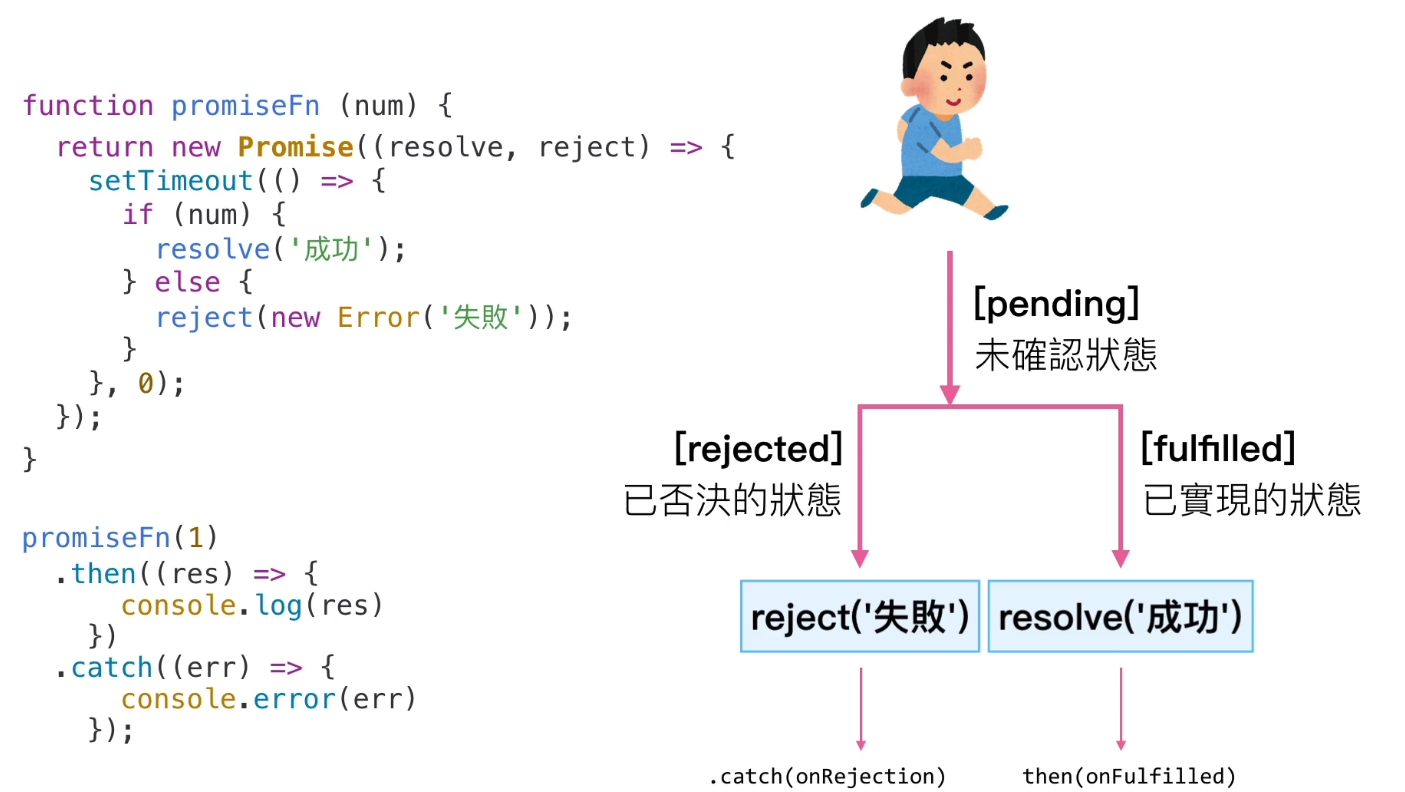
創立自己的 promise
1
2
3
4
5
6
7
8
9
10
11
| const promiseFn = (num) => {
return new Promise((resolve, reject) => {
setTimeout(() => {
if (num) {
resolve('success');
} else {
reject('fail');
}
}, 0);
});
};
|
以上方程式碼為例子,我們如果判斷 num 為真值時回傳 resolve;假值則回傳 reject。
1
2
3
4
5
6
7
| promiseFn(1)
.then((res) => {
console.log(res); // success
})
.catch((res) => {
console.log(res)
})
|
如果設定為 promiseFn 參數設定為 1 的話,那就會回傳 resolve 的值,所以會是 success。因為 1 在 JavaScript 裡是一個真值。
1
2
3
4
5
6
7
| promiseFn(0)
.then((res) => {
console.log(res);
})
.catch((res) => {
console.log(res); // fail
})
|
如果設定為 promiseFn 參數設定為 0 的話,那就會回傳 reject 的值,所以會是 fail。因為 0 在 JavaScript 裡是一個假值。
鏈接技巧
1
2
3
4
5
6
7
8
9
10
11
12
13
14
15
16
17
18
19
20
21
22
23
24
25
26
27
28
29
30
31
32
33
34
35
36
| const promiseFn = (num) => {
return new Promise((resolve, reject) => {
setTimeout(() => {
if (num) {
resolve(`success ${num}`);
} else {
reject('fail');
}
}, 0);
});
};
// Promise Chain
promiseFn(5)
.then((res) => {
console.log(res);
return promiseFn(6);
})
.then((res) => {
console.log(res);
return promiseFn(0);
})
.then((res) => {
console.log(res);
return promiseFn(7);
})
.then((res) => {
console.log(res);
})
.catch((res) => {
console.log('Catch', res)
return promiseFn(5);
})
.then((res) => {
console.log('Catch', res);
})
|
回傳結果 ↓ ↓ ↓
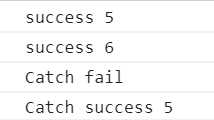
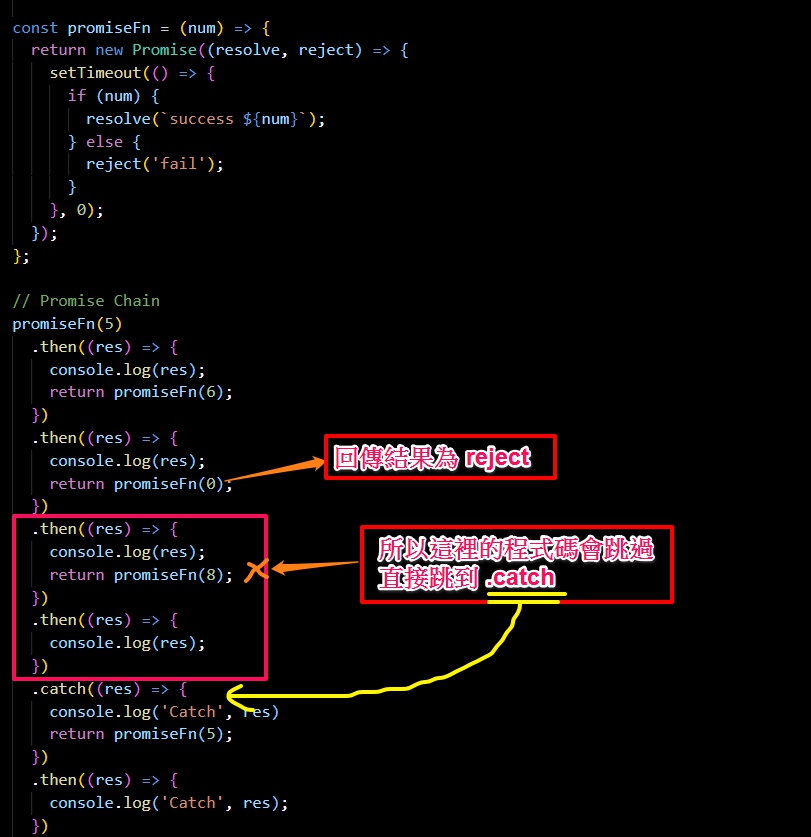
這邊可以看到 promise 可以用鏈結的方式一直回傳,BUT 如果在中間回傳的結果是 reject 的話它會直接跳到 .catch,但是 .catch 也是可以繼續用鏈結的方式回傳。
用 then 來做鏈接
其實 then 也是可以拿來做鏈接的技巧,因為 then 其實也可以回傳 reject 的結果,讓我們往下看下去吧。
1
2
3
4
5
6
7
8
9
10
11
12
13
14
15
16
17
18
19
| const promiseFn = (num) => {
return new Promise((resolve, reject) => {
setTimeout(() => {
if (num) {
resolve(`success ${num}`);
} else {
reject(`fail ${num}`);
}
}, 0);
});
};
// Promise Chain
promiseFn(1)
.then((res) => {
console.log(res);
}, (rej) => {
console.log(rej);
})
|
用 then 來做鏈接的方法就像這樣子,第一個會回傳 resolve 的結果,第二個則是回傳 reject 的結果。
可以把這個想成 if 判斷式會比較好記,第一個是 true 後執行,下面那個是 else,這樣下次聯想就可以更快的想起來了。
這個方式也是可以做鏈接唷 ↓
1
2
3
4
5
6
7
8
9
10
11
12
13
14
| promiseFn(0)
.then((res) => {
console.log(res);
return promiseFn(1)
}, (rej) => {
console.log(rej)
return promiseFn(2)
})
// 回傳後再繼續接下去,跟前面的方法其實差不多
.then((res) => {
console.log(res);
}, (rej) => {
console.log(rej)
})
|
這樣就會依序回傳 fail 0 和 success 2 的結果了。
Promise 常用方法
1
2
3
4
5
6
7
8
9
10
11
12
13
14
15
16
17
18
19
20
21
22
23
| const promiseFn = (num, time = 500) => {
return new Promise((resolve, reject) => {
setTimeout(() => {
if (num) {
resolve(`success ${num}`);
} else {
reject(`fail ${num}`);
}
}, time);
});
};
Promise.all([
promiseFn(1, 500),
promiseFn(2, 1000),
promiseFn(3, 2000)
])
.then((res) => {
console.log(res)
console.log(res[0]);
console.log(res[1]);
console.log(res[2]);
})
|
回傳結果 ↓

用 Promise.all 可以一次發出多個請求,但是回傳是用陣列的方式回傳。
如果回傳當中有一個是 reject 的話會出現這樣的結果 ↓
1
2
3
4
5
6
7
8
9
10
11
12
13
14
15
16
17
18
19
20
21
22
23
24
25
| const promiseFn = (num, time = 500) => {
return new Promise((resolve, reject) => {
setTimeout(() => {
if (num) {
resolve(`success ${num}`);
} else {
reject(`fail ${num}`);
}
}, time);
});
};
Promise.all([
promiseFn(1, 500),
promiseFn(0, 1000),
promiseFn(3, 2000)
])
.then((res) => {
console.log(res[0]);
console.log(res[1]);
console.log(res[2]);
})
.catch((res) => {
console.log(res)
})
|
上方程式碼只會回傳 fail 0。
在用 Promise.all 要特別注意,只要有一個是回傳 reject 的話,它就不會執行 resolve 的回傳了,只會回傳 reject 的結果。
Promise.race 只會回傳第一個完成的結果,不管結果是 resolve 或是 reject 它都只會回傳第一個完成的結果。
1
2
3
4
5
6
7
8
9
10
11
12
13
14
15
16
17
18
19
20
21
22
23
24
| const promiseFn = (num, time = 500) => {
return new Promise((resolve, reject) => {
setTimeout(() => {
if (num) {
resolve(`success ${num}`);
} else {
reject(`fail ${num}`);
}
}, time);
});
};
// Promise.race
Promise.race([
promiseFn(0, 500),
promiseFn(2, 300),
promiseFn(3, 1000),
])
.then((res) => {
console.log(res);
})
.catch((res) => {
console.log(res)
})
|
上方程式碼只會回傳 success 2。
因為 2 是第一個完成的結果,所以不會再執行其他的結果。
不管裡面的結果是 resolve 或是 reject 它都只會回傳第一個完成的結果。
可以看到這段程式碼並沒有執行其他的任何結果,只會執行第一個完成的結果。
利用 Promise 讀取 Ajax
正常我們在讀取 Ajax 的時候都要寫得很長一段,但是利用 Promise 就能夠統一利用函式的方法來。
1
2
3
4
5
6
7
8
9
10
11
12
13
14
15
16
17
18
19
20
21
22
23
24
25
26
27
28
29
30
| var url = 'https://jsonplaceholder.typicode.com/todos/1';
const getFn = (url) => {
return new Promise((resolve, reject) => {
var req = new XMLHttpRequest();
req.open('GET', url);
req.onload = function () {
if (req.status === 200) {
resolve(req.response);
} else {
reject(req);
}
};
req.send();
})
};
getFn(url)
.then((res) => {
console.log('get', res);
return getFn(url);
})
.then((res) => {
console.log('get2', res);
})
.catch((rej) => {
console.log('err', rej)
})
|
回傳結果 ↓
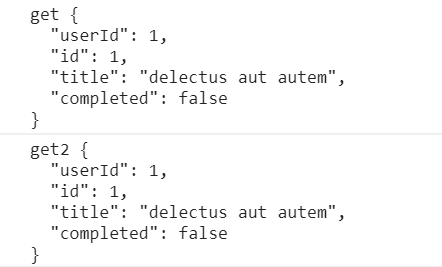
這樣當你需要利用 Ajax 的時候只要利用 getFn() 就能夠快速地做出請求了!


